Drywall 101: The Roadmap for Drywall Layout

If you’re a beginner stepping onto a partially finished jobsite, there’s going to be a lot of new information to take in all at once. What are all these messy white markings? Why are there so many holes cut into all the walls? When, exactly, do I get to break for lunch? In this edition of Trim-Tex’s Drywall 101 series, we’re going to take a look at the various elements of drywall layout — from butt joints to corner beads — that you’ll find in most drywalling jobs, show you where they’re located and explain why they’re important.
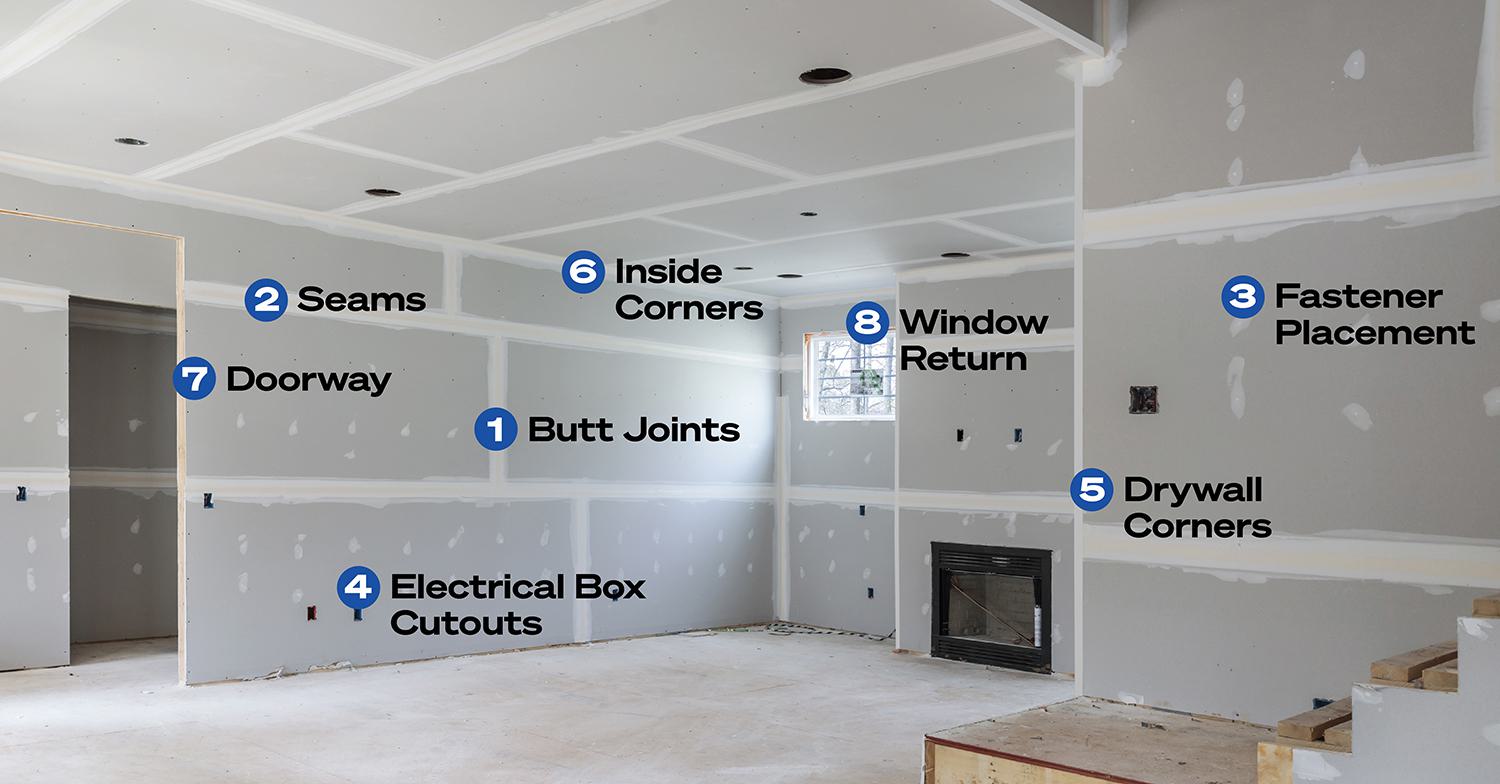
If you’re a seasoned drywall pro, maybe you can use this photographic guide to help get your next apprentice up to speed; if you’re just starting out, well, we hope you figure out when your lunch break is, because some of these features of drywall layout are much easier to explain than install.
1. Butt joints

Butt joints occur wherever the unfinished edges of two sheets of drywall meet. As you can see in the partially finished home we’re looking at today, the drywall sheets along the wall are hung horizontally (as they typically are for residential — you’re more likely to see vertically hung drywall in commercial construction), so our butt joint lines run vertically.
Since drywall sheets need to be fastened to a stud with an eighth-inch space between them to allow for slight building movement, butt joints will need to be finished by applying a bedding coat of joint compound (a term you may never hear again, as everyone calls it “mud”), then applying paper tape and, once it’s all dried, another coat of mud. Be sure to “feather the edges” of that top coat with your taping knife to get the surface as smooth as possible — you can learn more about how to do feathered edges here.
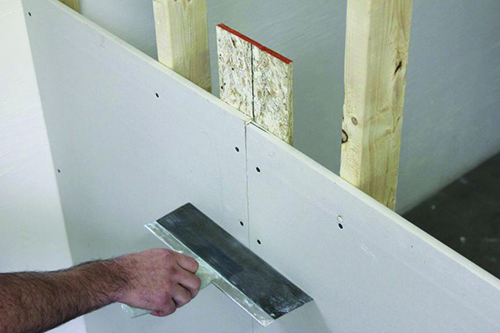
Better yet, you can skip a ton of manual labor here by hanging the sheets of drywall on a piece of Buttboard (pictured above), rather than landing everything on studs. Buttboard, a uniquely engineered plank of OSB, will pull back the drywall to mimic a factory-finished edge, eliminating the butt-joint bulges that will normally rise out of all that taping and mudding.
In the home we’re working on here, all the taping has already been done, so all that’s left to do is sand down our mud to get the walls and ceilings nice and flat. In fact, keep in mind that essentially everything that’s lined in white in these photos will require some sanding. For this, finishers are always raving about the abrasives we offer in a variety of angles.
2. Seams

Also simply known as joints, you’ll see long seam lines along the factory-finished edges of our drywall sheets, running perpendicular to our butt joints. Since these edges come pre-tapered, you’ll have less trouble sanding these bits down after taping and mudding them. Like the butt joints, tape has already applied to our seams in our example home, so these joints just need to be sanded down before the painting phase — unless this job requires a Level 5 finish, in which case a skim coat of mud will be applied to the entire wall after we’re done with everything else. (You can learn all about the six levels of finishing standards here.)
3. Fastener placement

If this were your first time looking at drywall layout, one of your first questions would probably be, “What are all those little white dots all over the walls?” Those spots mark where the people who hung the drywall placed their fasteners, which are normally 15/8 ” coarse-thread drywall screws. These should be driven into the surface of the drywall every eight inches or so to firmly attach the sheet to the house’s studs. You’ll notice that our finisher in this house has placed a single, thin splotch of mud over most of the drywall screws already, but will need to apply another coat or two before doing some sanding. Otherwise, those screws will be plain as day even after the painters come through, especially in heavy lighting.
4. Electrical box cutouts

Cutting out spaces for electrical outlets, light switches and so on is going to be one of the more frustrating parts of your job as a drywaller. In most cases, you’ll need to precisely measure where these kinds of details are located, then make the cuts in the corresponding areas in the drywall before you hang it. Measure several times before making those cuts with a jigsaw or handsaw though — it’s so easy to make a slight mistake here, and can be so time-consuming to make even minor adjustments. Even worse, you can burn through drywall material quickly if you’re not careful.
Alternatively, you could use a Blind Mark or something similar here to cut back on the guesswork. A Blind Mark is a metal device that you’d place in the electrical box before hanging the drywall; then, after temporarily hanging the drywall, you use a powerful magnet to find the exact dimensions of the box, which you mark down and make your cuts. It’s still not always an exact science, but it could save you some headaches down the road.
5. Drywall corners
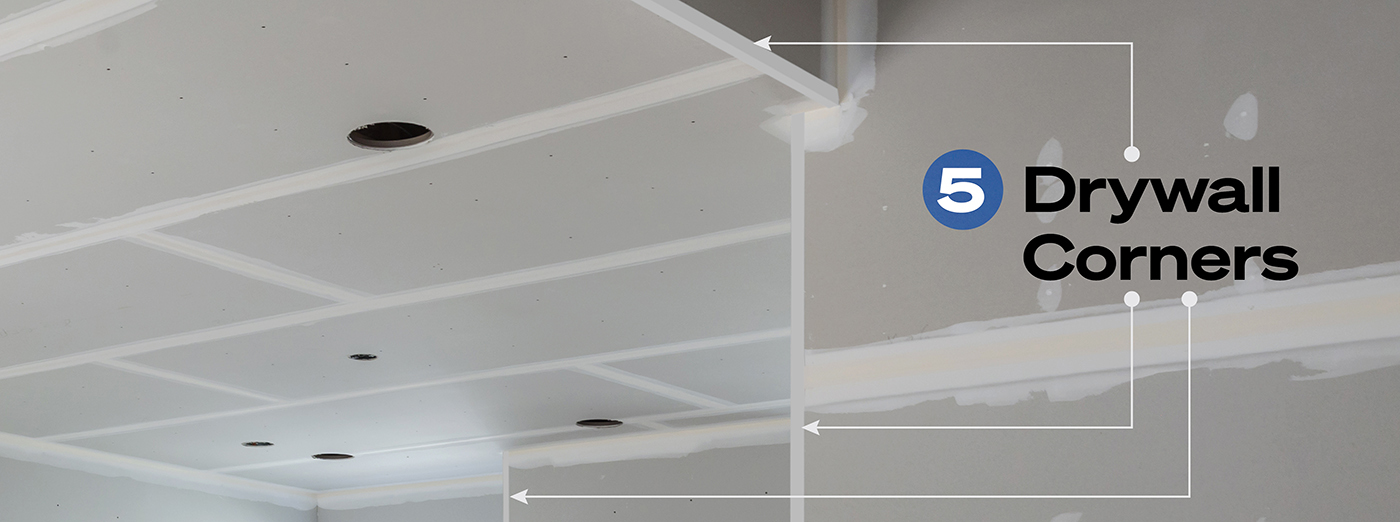
While the surface of drywall is known for being durable and long-lasting, the edges of those sheets are anything but. That’s why you need some extra protection on your drywall corners — and that’s where Trim-Tex has made its bread and butter for over 50 years now.

Through the years, corner beads have been made from a wide variety of materials (you can learn about that history in this previous installment of Drywall 101) but, for our money, you’re not going to find a more impact-resistant material that’s built to last a home’s lifetime than vinyl. We don’t have the time to tell you about all the different kinds, styles and profiles of corner bead that are out there — to get the gist, just take a poke around our collection of over 200 unique solutions, each of which has its own perfect time and place — but if install speed and material savings are the names of the game for you, your best bet will be Fast Edge® Paper.
Since all of the corners in our example house are basic, 90-degree angles, we could get Fast Edge Paper corner beads up and running in no time on each of them. There are a couple ways of going about installing this speedy corner bead, but our favorite involves simply running the bead through a mud-filled hopper, then sticking the bead on the wall, using a roller to make sure it’s applied evenly. Once that’s dried, you’re already ready for your finishing coat, saving you an entire day over most other kinds of corner bead. This video will show you just how fast Fast Edge can be for protecting these drywall corners.
6. Inside corners

Since, as we covered in our last element of drywall layout, the surface of a sheet of drywall is fairly strong, it’s not as common for drywall finishers to outfit inside corners like these with the same kind of protection as their outside corners. Most of the time, including in this house, the finisher will just use paper tape in these areas.
Still, though, an inside corner can suffer a ton of damage over the years, especially if you’re placing something like a bed or desk right up against it. To protect inside corners from day-to-day impact, there’s you can use an inside corner bead; there are a number of different styles you can choose from here, including adjustable ones for weird angles. Besides, your inside corners will look straighter and sharper than just using paper tape like our finisher did here.
7. Doorways

Another area that is going to receive a lot of impact over time, your doorway is going to need extra defense. This is an area that allows you to craft some pretty cool details, like using some decorative corners to make that area stand out. Whatever look you choose, you’ll need to place corner beads on either side of the doorway and finishing the door jamb in between them. But, again, if efficiency is your priority here, we couldn’t recommend using Fast Caps around your doorway highly enough. Fast Caps protect the entire surface of the door jamb with vinyl in a single step, making your job quicker and easier. Just use glue or staples to install the Fast Cap, mud it in and, just like that, your doorway’s ready for final finishing. Our model home’s doorway just has your basic 90-degree corners, but there are Fast Caps and tons more solutions for archway doors as well.
8. Window returns

Lastly, your windows are going to be one of the most attention-grabbing areas of your room, so a finisher needs to be especially sure to safeguard the returns around the windows, which always seem to attract knicks, scratches and dents. In our example house, there’s still a good bit of work left to be done around the windows, but once we’re ready to place our corner beads, the most streamlined way to protect these returns is to simply use a single Super L Bead (or, if you’ve got especially wide window returns, Giant L Bead) for each of the return surfaces.
Like the Fast Caps, these are installed with glue and/or staples before mudding them, and will cover the entire surface of the return they’re installed onto, taking out a few extra steps and added materials along the way. Check out this video to learn how these extra-large L Beads work and why they’re such handy tools to keep in your personal drywall-finishing arsenal.
Understanding the many different elements of drywall layout may only be among the first steps in your journey to becoming a master drywall finisher, but it is a crucial one. We hope this roadmap will set drywalling beginners on the right path, and maybe even teach an old dog a trick or two. For more drywall tips and tricks — which we here at Trim-Tex publish every single week — hit the button below to sign up for our monthly e-newsletter to never miss a thing!

Trim-Tex in Your Inbox
Subscribe to our e-newsletter for monthly tips, news, case studies and updates