How to Finish Shower/Bath Enclosures

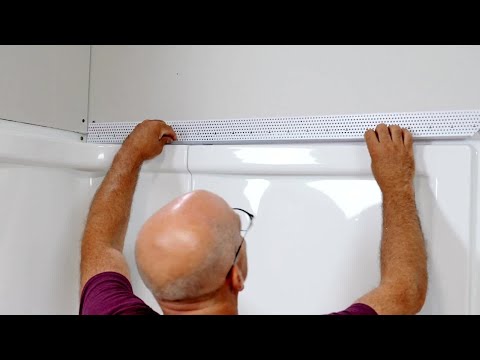
To finish shower/bath enclosures, your task is to ensure water can’t get into that small gap left between the enclosure and the drywall around it. The traditional way to do this would be to fill that entire gap up with hot mud and then paper-tape over it, but it’s messy and time-consuming, and the paper tape can grow mold in such a moisture-rich environment. You could use mesh tape, sure, the process is still going to be a major pain. Your other option is to use the only solution specifically manufactured to help you complete this task quickly, easily and affordably: Shower Bead.

In this edition of Fine Homebuilding’s “Mastered in a Minute” video series, the experts at FHB show you, in a single minute, how to use Shower Bead to finish around tubs. Check out the video below:

Fine Homebuilding - How to Finish Drywall Around a Shower Enclosure

As you can see in the video, Shower Bead is a simpler solution for tub enclosures because is easily spans the gap between the drywall and the shower flange, saving you mud, time and headaches. Really, you can use Shower Bead for any gap between drywall and another substrate that’s two inches or less (see how we used it to finish around a window here) — but the bead’s oversized mud leg and its rust-proof, mold-proof vinyl materials make it the ideal choice for enclosures like this one.

Here's how to finish shower/bath enclosures with Shower Bead: As the video shows, you’ll need to hang your drywall abutting, but not overlapping, your tub flanges. Cut the bead to size and miter each corner. Spray the bead and the drywall with some 847 Spray Adhesive and, once it’s gotten tacky, apply the bead so that its tear-off strip is butting up against the bath; you’ll finish installing the bead by hitting it with half-inch staples every six to eight inches.

Once you’ve applied two to three coats of mud and everything’s had time to dry, you’re ready to rip away the bead’s tear-off strip. Lastly, after sanding down youredges as needed, grab some high-quality caulk and apply it evenly between the drywall/edge of the bead and the enclosure to seal everything off. This method is much faster, much less labor-intensive and leaves a cleaner finished product.

How to finish shower bath enclosures 4

Now that you’ve learned the basics of how to finish shower/bath enclosures, you may want to get a better look at this handy bead for yourself. Fill out the form below to request a free sample of Shower Bead, and to learn more, see how a Southern California drywall crew used the bead for a massive multifamily project here. Thanks to Fine Homebuilding for the video!