The Trim-Tex catalog is chock-full of solutions for very specific problems. Need something to quickly to cover the exposed surface of a door jamb? Try Fast Caps. Need to protect the finish around your ceiling trusses from movement during the winter months? Go with our Truss Backing Angle. But when it comes to your basic 90-degree corners, it’s tough to beat the easy spray-and-staple installation and clean finish of our flagship vinyl Corner Bead & Archway, often simply referred to by its SKU, 4010. If you’ve never had the pleasure of using this tried-and-true corner bead, you don’t have to take our word for it — in this video, social media’s favorite finisher Lydia Crowder, AKA Drywall Shorty, shows you how to install vinyl corner bead, and explains why it’s such a popular addition to any finisher’s toolkit.
Drywall Shorty Shows You How to Install Vinyl Corner Bead

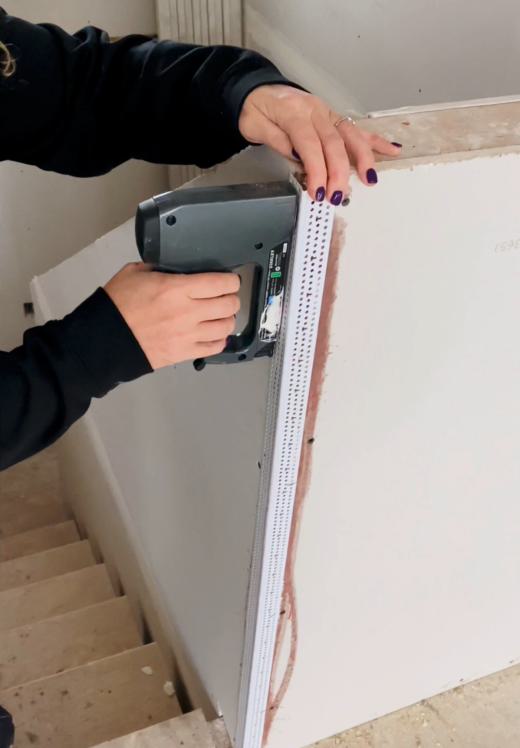
The first step in learning how to install vinyl corner bead is to gather the proper tools; to do this properly, you’ll need a can of our 847 Spray Adhesive and a staple gun.
Hit both the corner bead and the drywall with a light coat of adhesive, wait a minute for it to get tacky, and apply the bead to your corner. Press firmly to make sure your bead is really stuck into place, then affix the bead to the wall with half-inch staples every six to eight inches. (If you weren’t able to acquire a can of the 847 Spray, you’ll need to double up your staples, applying them every two to three inches.)
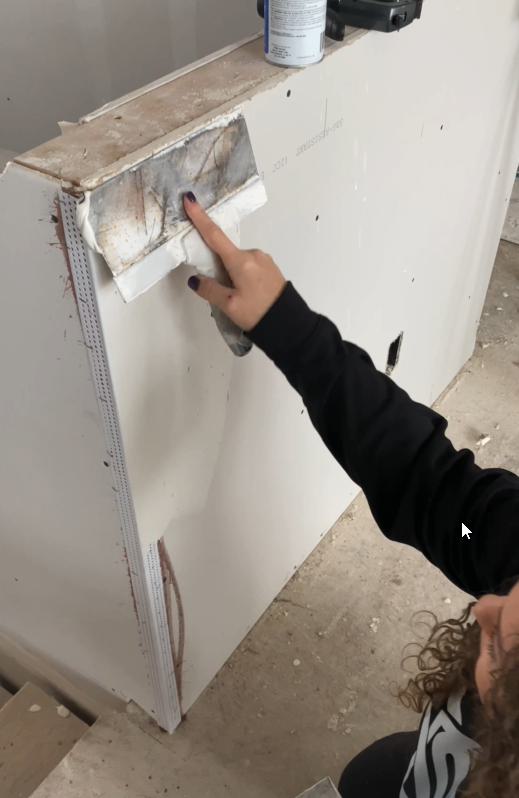
Now it’s time to start mudding — a standard vinyl Corner Bead & Archway allows you to start your initial fill coat of joint compound immediately after installation. You’ll want to coat the entire bead with a good amount of mud, and as Lydia points out in the video, you’ll start to see how this corner bead profile will leave you with a nice, soft, slightly rounded edge by the time you’re done. Once you’ve completed your fill coat, leave it to dry, and come back with one more coat of mud for a level-three finish and two more for level four (you can learn more about the levels of drywall finishing here).
So, now that you’ve learned how to install vinyl corner bead, you may ask: why should you choose this corner bead over the more traditional, metal kind you might find in your everyday home-improvement store? We’ve got some thoughts on that subject, but we’ll let Drywall Shorty herself handle that question. As she told us when she visited Trim-Tex HQ in September 2021:
“Metal is hard to repair. If it gets damaged or it gets dented or dinged, you're usually having to pull out the whole stick. The way that metal is installed is, usually we use an inch-and-a-quarter staples, so it goes all the way down into the framing. When you're having to come back and repair metal, it's a very lengthy process because you're having to pull it off, then you're having to put it back on. Then usually metal corner bead takes three to four coats to get it completely full, so then you have more time spent on making sure that product is finished. It's just it's hard to fix it once it's damaged … It ruins the sheetrock, too, when you pull it off, because you have to pry it off, so then your backing, your drywall board is also ruined.”
Our standard Corner Bead & Archway is just one option in Trim-Tex’s arsenal of drywall-finishing solutions. For corners like this, there are so many possibilities for different looks, different installation methods and different problem-solvers. To get the full picture, download a digital copy of our full catalog by hitting the button below!

Find Your Next Solution
Download a digital copy of the latest Trim-Tex catalog now, viewable on your computer, phone or tablet