Drywall 101: How to Create Drywall Archways

If there’s a single architectural detail that can take an interior space from basic to breathtaking, it’s archways. Entryways, built-ins, windows: add a curved arch to any element like these, and you’ve got something that will catch eyes and start conversations. But if you’ve never installed an archway before, it can seem intimidating — how is drywall supposed move and bend like that? For beginners in the art of drywall finishing, this is “Drywall 101,” and this is how to create drywall archways that make you say “wow.”
Check out the below video to see how we created a drywall archway over at Trim-Tex HQ from start to finish, and read on for more detailed step-by-step instructions.


Step 1: Measure both the entire wall and the archway
Once the framers have come and gone, leaving the lumber installed for your archway (in this case an arched entryway, but these same steps apply for any arched detail), measure the entire space where your drywall will be hanged. Then measure the width of your archway. Make sure you also measure the space in between the topmost point of the archway and the ceiling.
Step 2: Cut drywall to length
If the space you’re drywalling is shorter than the length of a sheet of drywall, cut down your sheet to the same length as measured in step one.
(Note: in this guide, we are only describing the work for one side of your archway. For an arched entryway like ours, you will need another drywall sheet for the other side of the wall, and will need to repeat this step, as well as steps three through eight, to drywall the other side.)
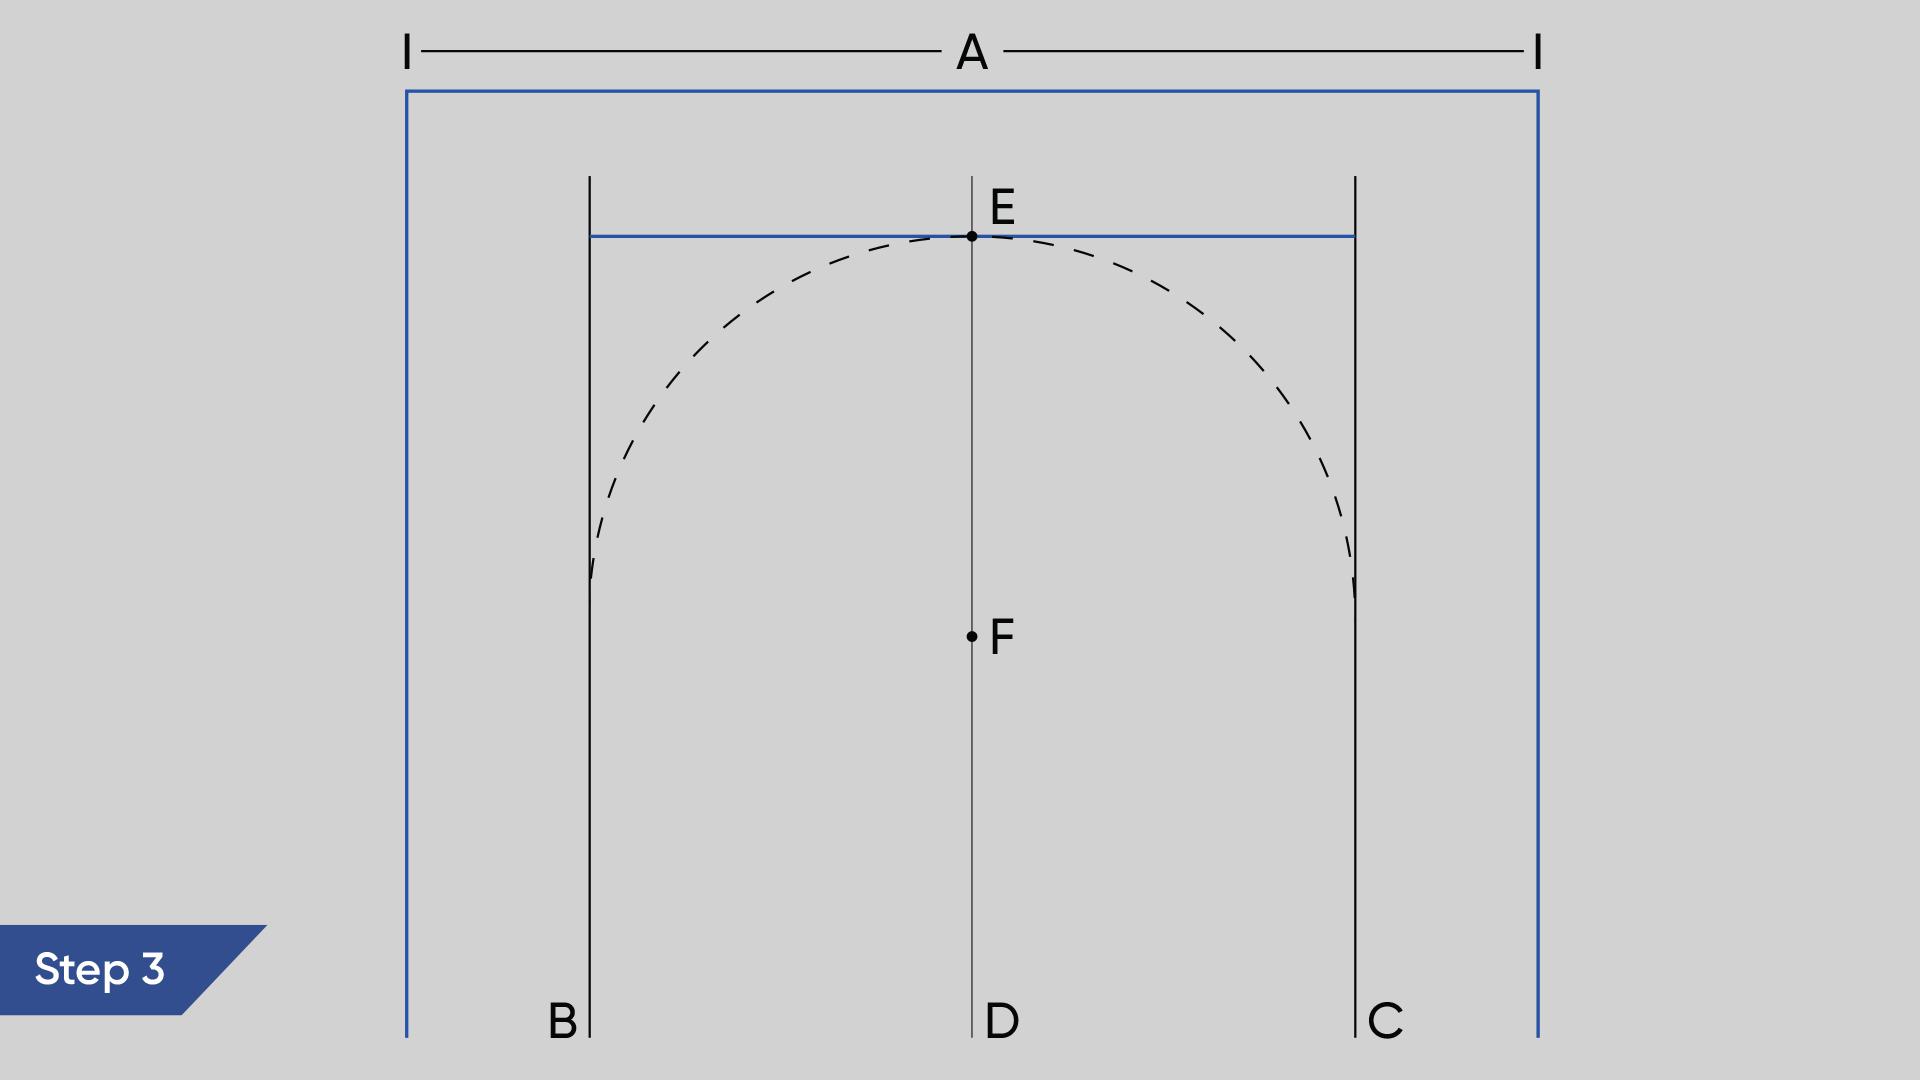
Step 3: Measure and mark your drywall
Resting your sheet of drywall (represented as length A in the above diagram) on a flat surface, first draw two vertical lines onto the drywall demarcating the width of the archway (B and C). Now find the exact midpoint between those two lines and mark another vertical line in the middle of the archway (D).
Measure out and mark a spot toward the top of line D to represent the highest point of the arch (E). Now, finally, find a point along line D where, when drawing a semicircle or arced line from that point, the line lands on all three necessary spots: B, C and E. This may take a few tries, but once you’ve found that point, mark it (F).
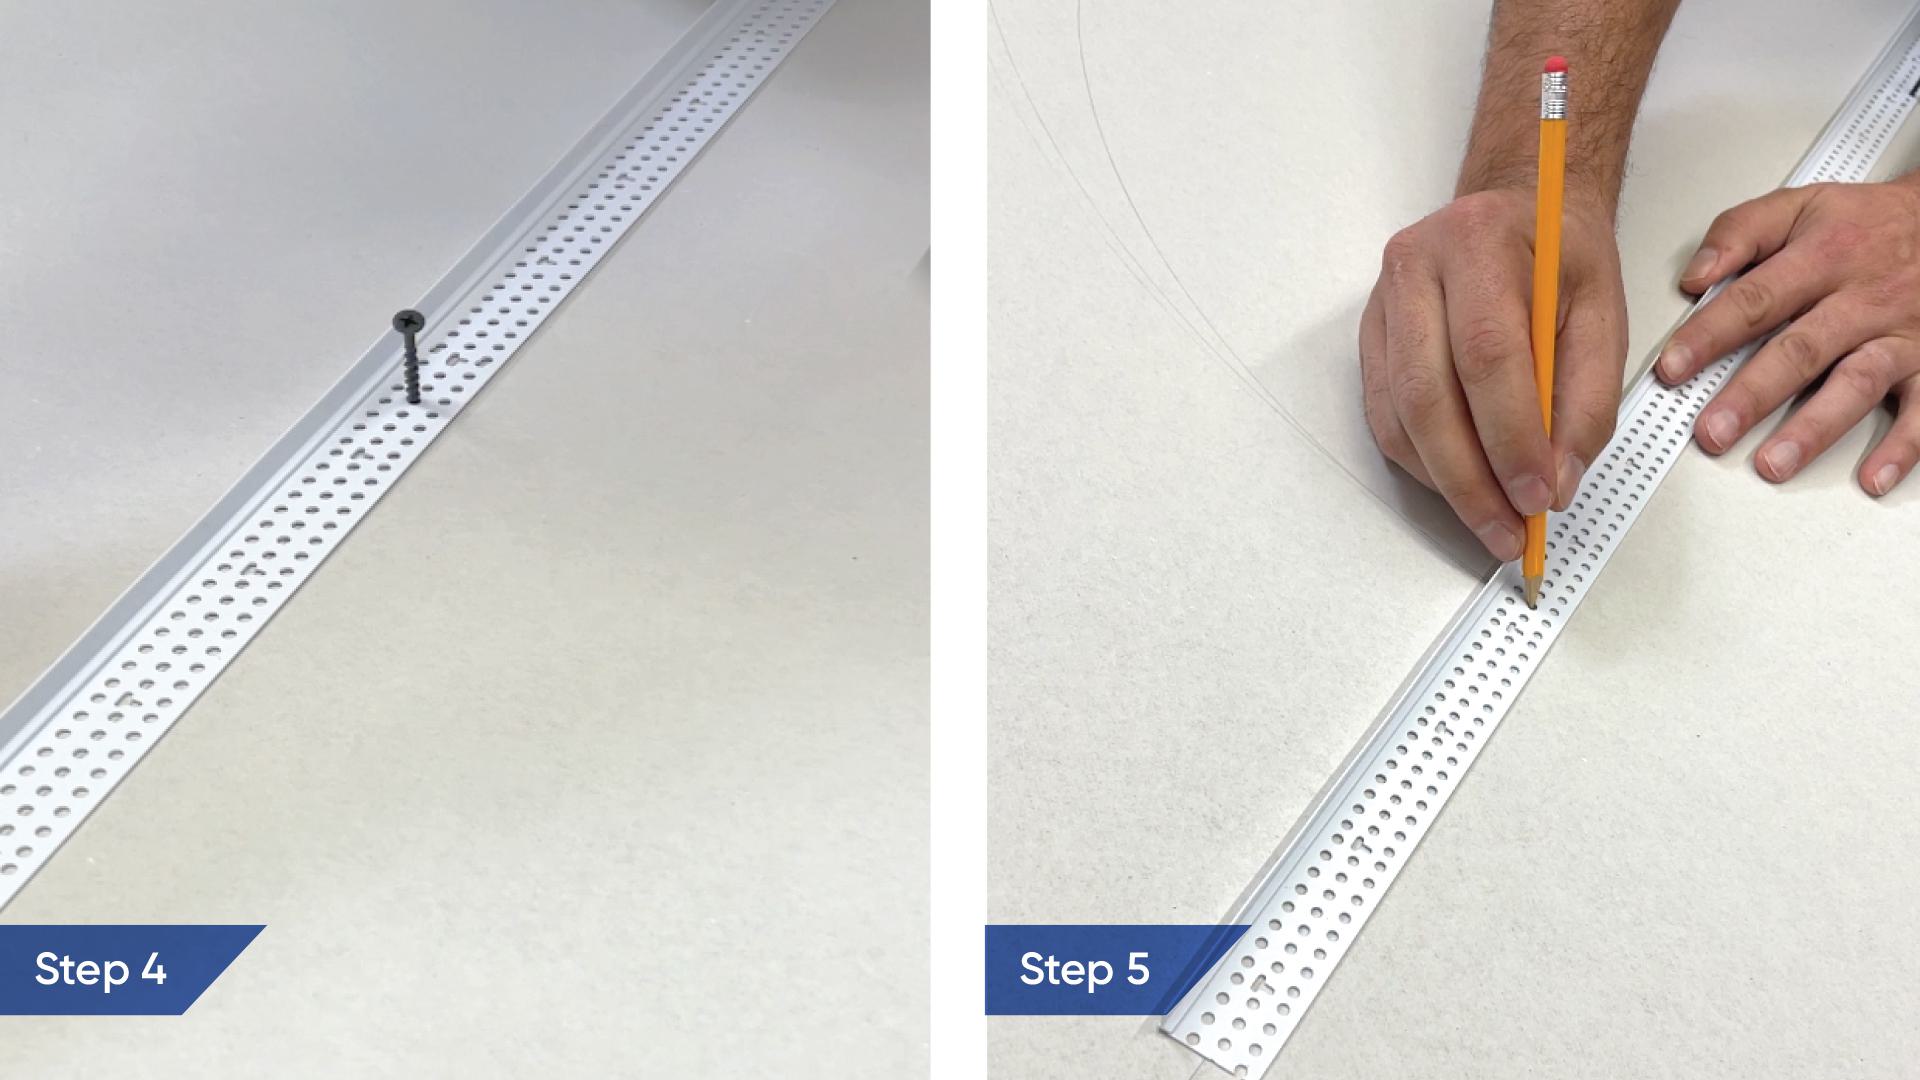
Step 4: Place a screw into the drywall
Drive a screw into point F (see step three) so that it’s affixed to the surface of your drywall, but not too deep. This screw will serve as your anchor when drawing your perfect arch.
Step 5: Mark your archway
We’ve found that Trim-Tex’s vinyl beads just so happen to make for the perfect aide when drawing out an arced line. So if you’ve got any spare beads lying around (we used an Architectural L Bead for ours, but you could use anything from a Tear Away L Bead to a regular Trim-Tex Corner Bead) pick one up and stick the screw you’ve affixed to point F through one of the holes on its mud leg.
Land the tip of your pencil on point E of your drywall and swing the bead around in a semicircle. Again, this may take a couple tries to get right, but in the end, you’ll have a perfect arced line. Don’t have a spare Trim-Tex bead? You could accomplish this with a piece of string.

Steps 6 & 7: Cut out your archway
Using a combination of a drywall/jab saw for the arced lines (step 6) and a hand saw for the straight ones (step 7), carefully cut out your archway. If your lines aren’t perfectly even, that’s normal — that’s what your corner bead is for!
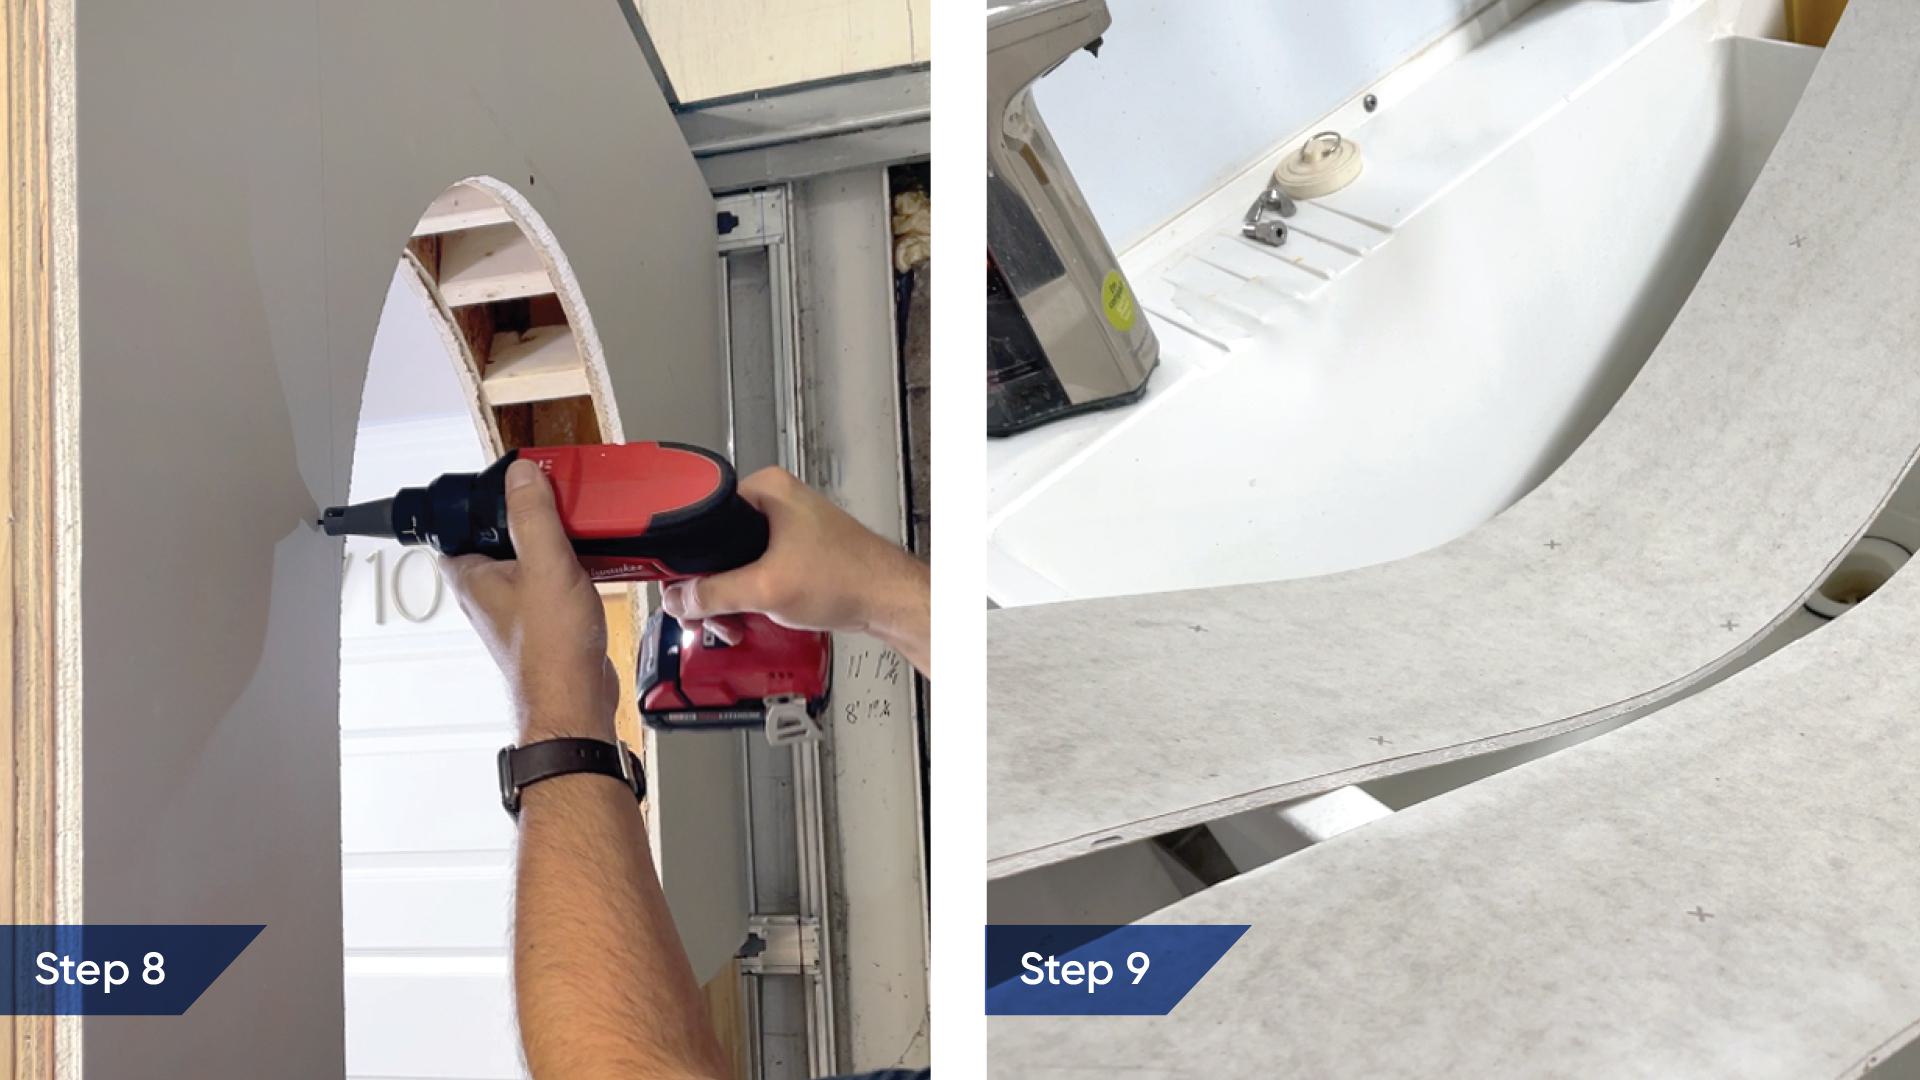
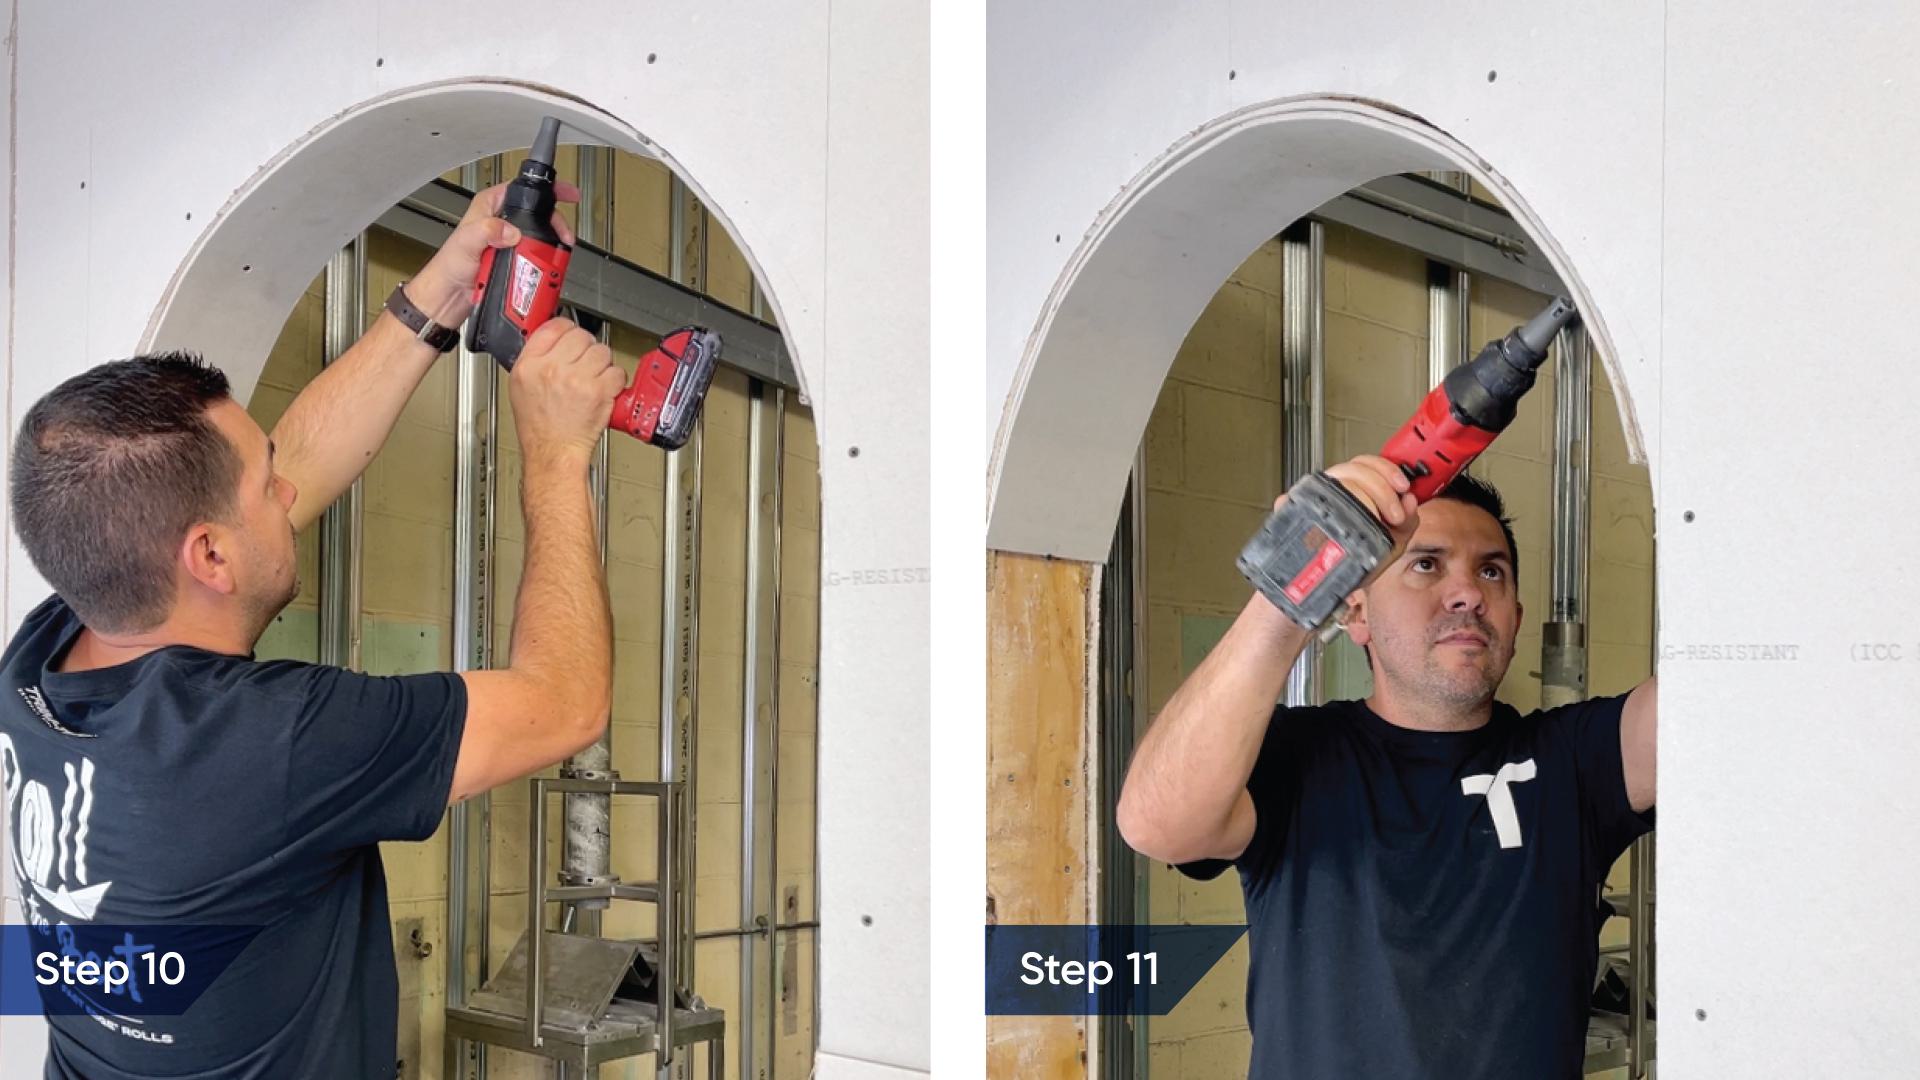
Step 8: Hang the drywall
Lift your newly cut drywall into place over the archway framing and apply one screw toward the top to hold it there for now. You may now permanently attach the drywall arch to the framing with screws.
Step 9: Cut and dampen two ¼” strips of drywall for the arch’s interior
These next few step can be tricky for newbies (and sometimes pros too!), so make sure you’ve got plenty of spare ¼” drywall to complete drywalling your archway.
Measure the width of the curved interior midsection of your archway. Cut two strips of ¼” drywall to match this width. Now, take those two strips of drywall and apply water to both with a sponge. Allow some time for the water to soak in and for the thin drywall to become flexible.
Step 10: Attach first ¼” drywall strip to the arch’s interior
Very carefully so the drywall doesn’t break, lift your now-flexible strip of drywall onto the curved interior section of your archway. Attach it to the framing with screws.
Step 11: Attach second ¼” drywall strip to the arch’s interior
Gently line up your second flexible piece of drywall with your first, and attach it to the framing as well. Once both pieces of thin drywall are fully dry, you’ll have a durable, curved ½” drywall archway interior.
Finish off drywalling any other sections of the archway framing that are still exposed, and congratulations! You’ve just drywalled an archway. Now all you have to do is finish that drywall.
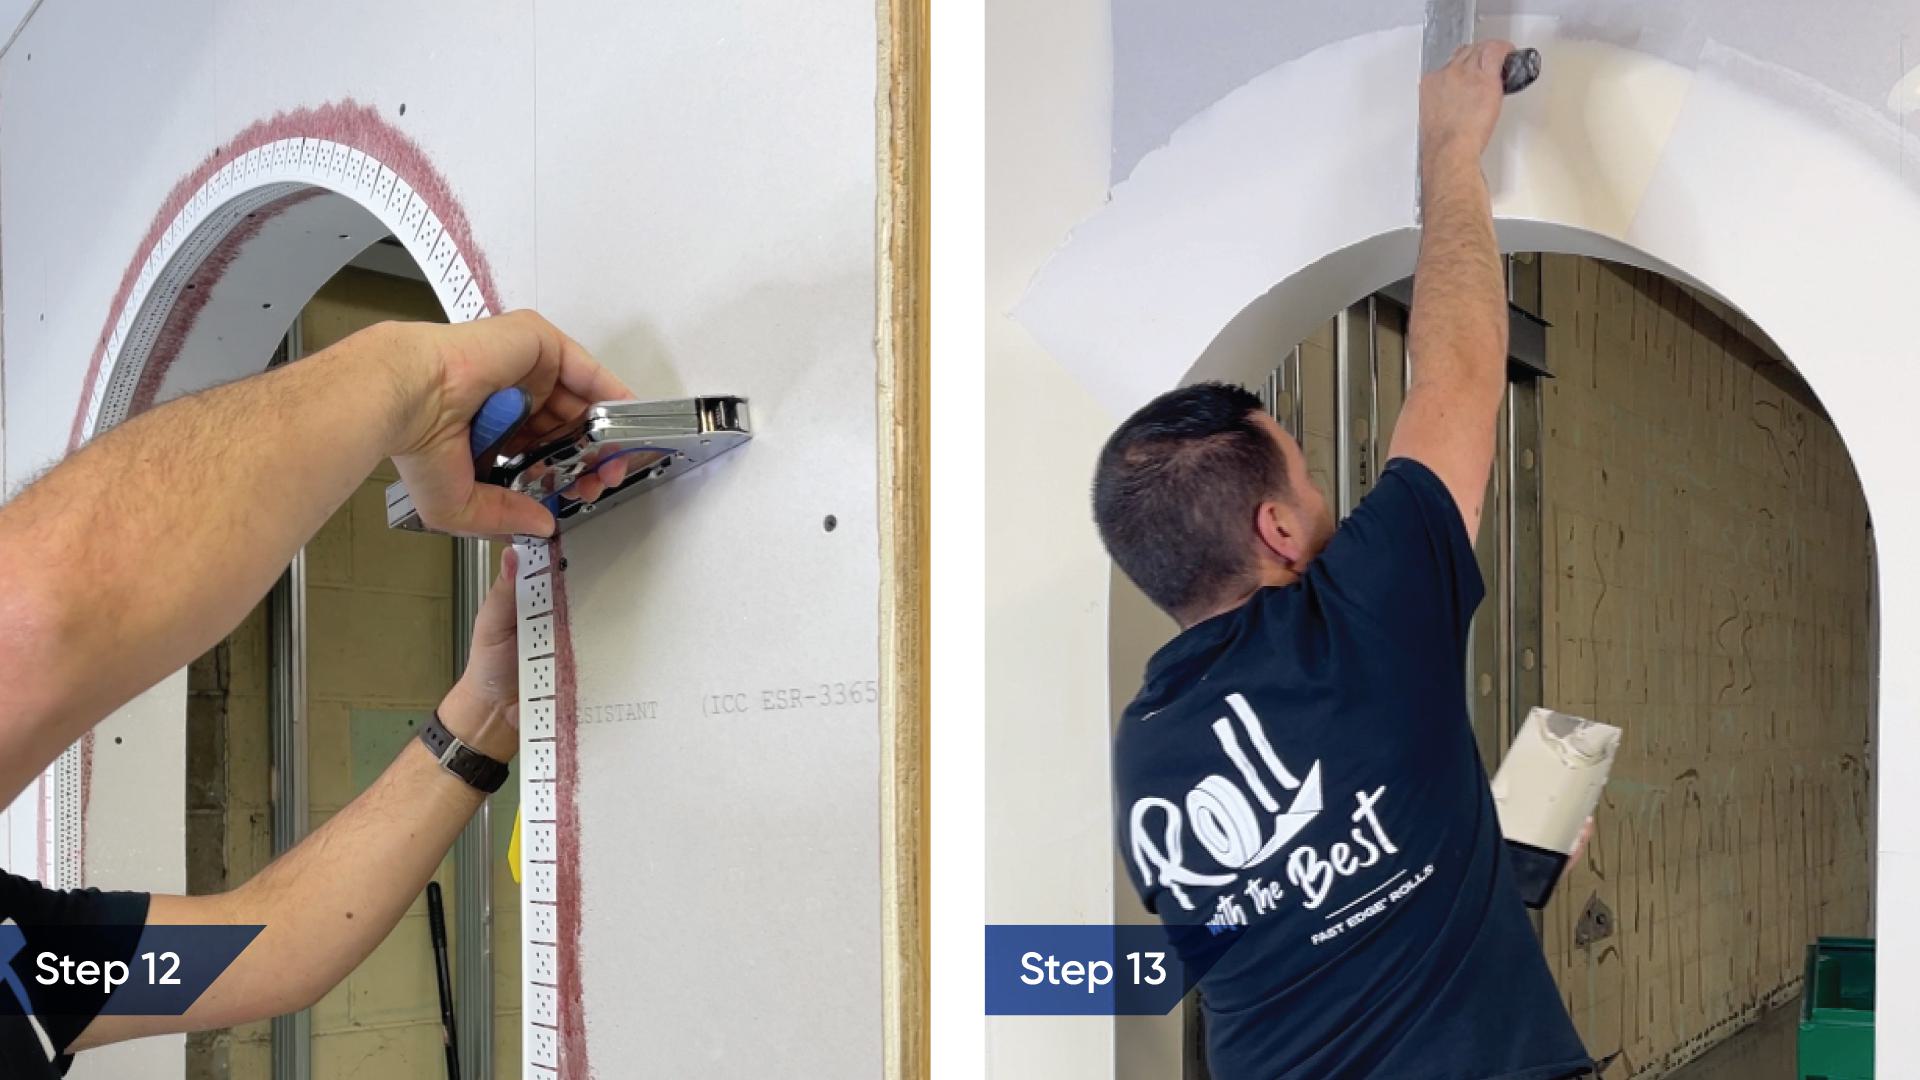
Step 12: Install archway corner bead with spray adhesive and staples
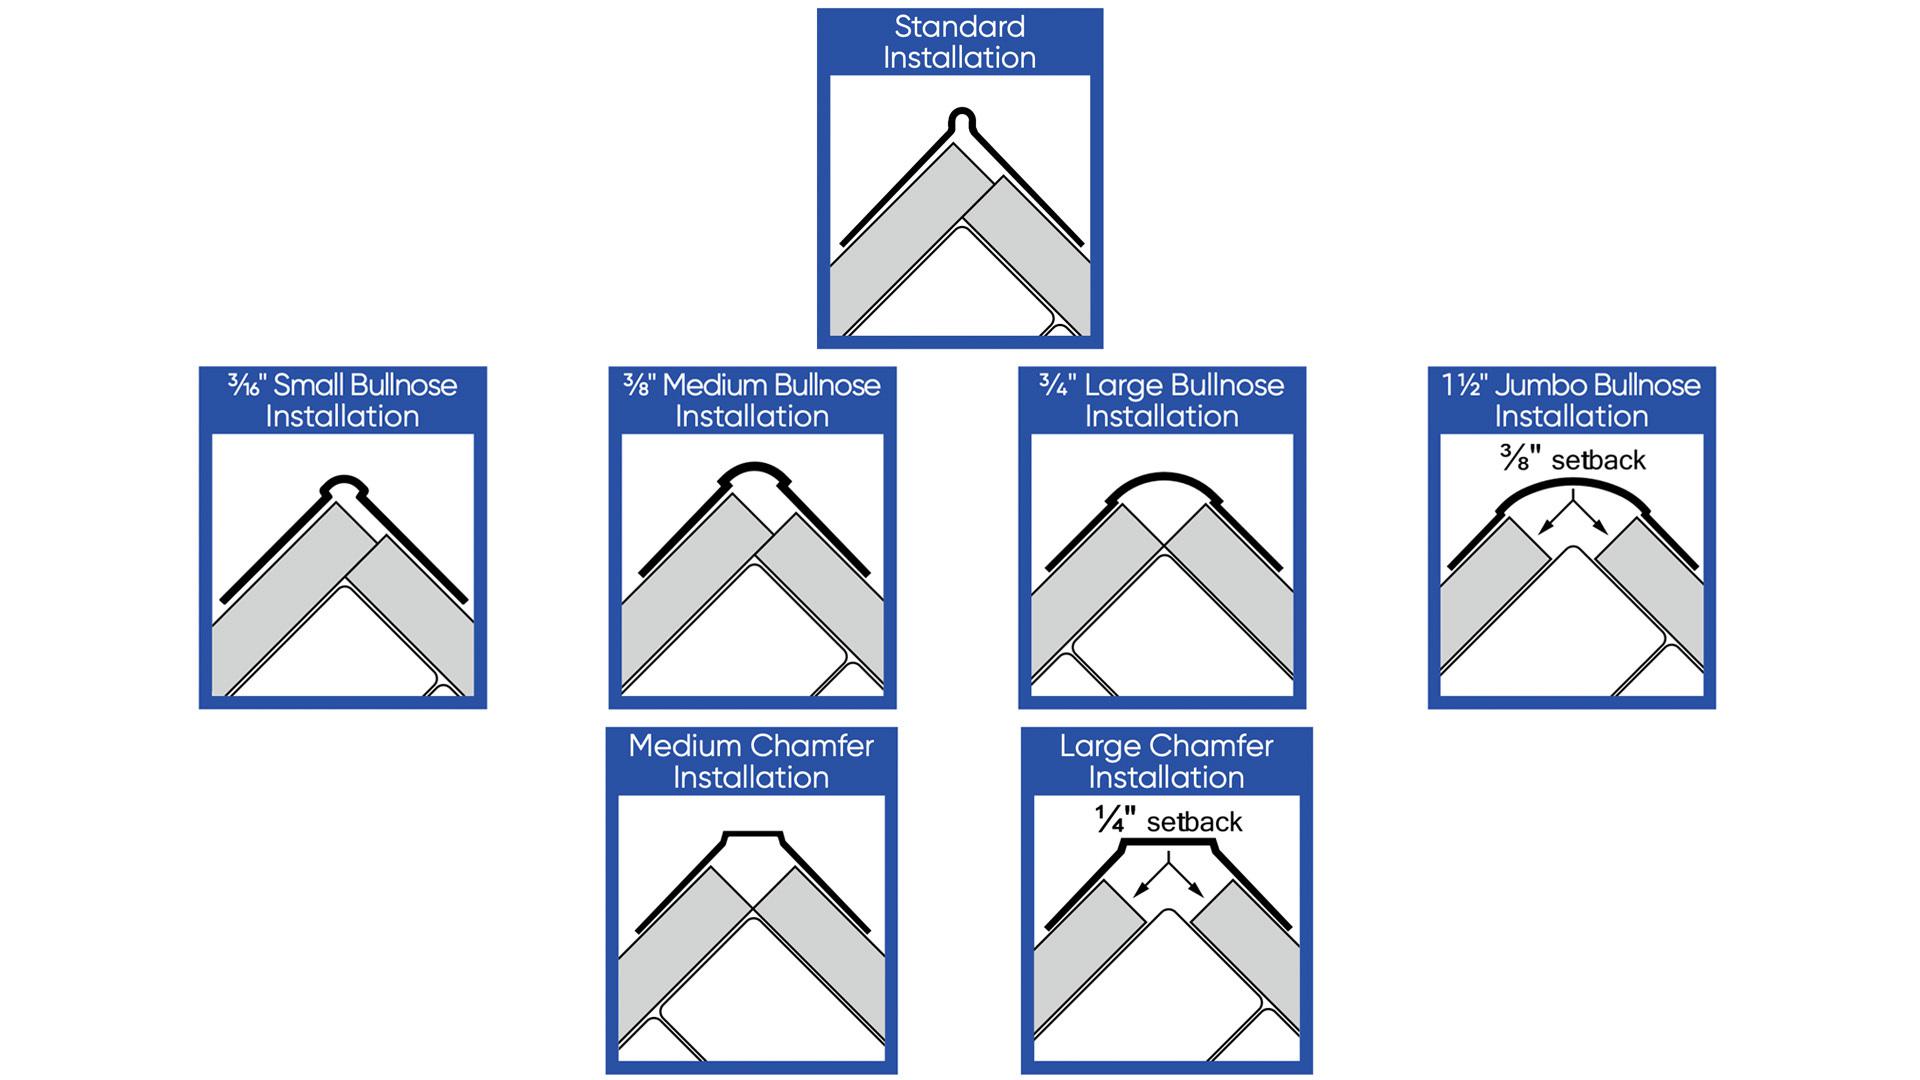
Trim-Tex is the pioneer in flexible vinyl corner bead manufactured for arched details — archways simply aren’t finished without us. You’ve got numerous, pre-notched options to choose between to determine the final look of your archway’s corners.
For the example archway we built, we chose the soft, slightly rounded profile of our standard Archway Corner Bead for one side of the wall, and the sharper edges of our Rigid Low Profile Archway bead for the other. You could also go with a more decorative look for the edges your archway, like a rounded Bullnose (you can learn more about bullnose arches here) or a crisp Chamfer; just make sure you’ve hung your drywall with the proper setback for installing these decorative beads.
Trim-Tex’s vinyl archway beads are installed by applying two coats of 847 Spray Adhesive to the drywall, the bead or one of each. Wait a few seconds for the adhesive to get tacky and press the bead into place, applying pressure evenly across its mud legs. Then finish installation by applying half-inch staples every six to eight inches on each side of the bead. You may find more detailed installation guides here, or on the webpages for each of the above linked products.
Step 13: Apply two coats of mud
Mix up some joint compound and apply a smooth initial coat across the surface of your arch — from the outer edges of your corner bead to the entire inner section. Once that’s dried, come back and do it again. Going for a pristine level-five finish? Do it one more time, with a skim coat on all your drywall.
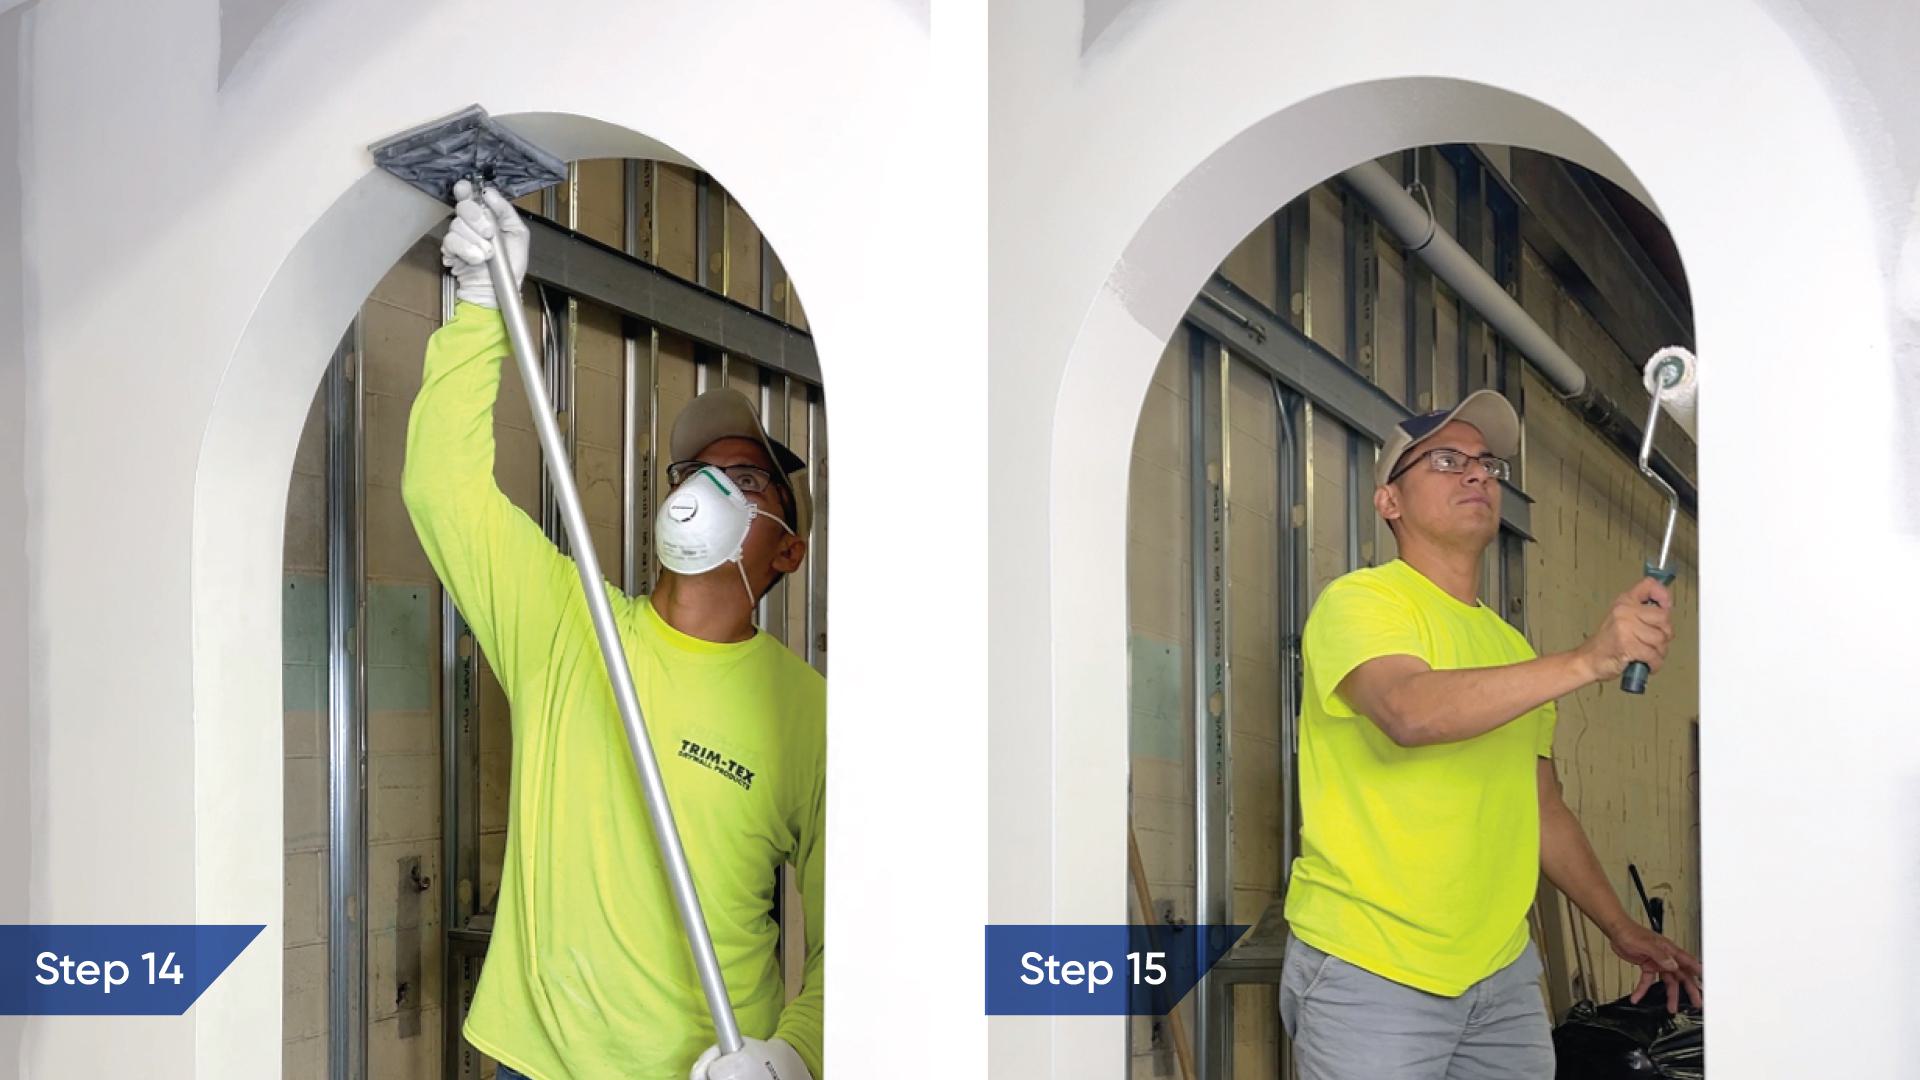
Step 14: Sand
Every drywall finisher’s least favorite part of the job — sanding. We make it a little easier on you with easier-to-use abrasives like the Black Widow Pro Sander, pictured above, to reduce user fatigue, and Dual Angle Dual Grit Sanding Blocks for hitting all those hard-to-reach spots. When sanding, make sure you’re using proper protection against all that dust you’ll kick up, including eye protection and a ventilator mask.
Step 15: Paint
Choose your favorite color and favorite brand of paint, grab a roller and get to work! Once you’re done, provided you’ve followed all these steps perfectly, you’ll have a gorgeous drywall archway to brag about!
Now that you’ve learned how to create drywall archways, we’ve got a ton of other advice, tips and tricks to help you up your game and become the ultimate pro drywall finisher! We publish a new story like this one every single week — hit the button below to sign up for our monthly email newsletter to never miss another update from Trim-Tex!

Trim-Tex in Your Inbox
Subscribe to our e-newsletter for monthly tips, news, case studies and updates